Step 1 Random Generator Tool[]
- Open the "PlugInBasedEditor"
- Create new random map (Menu Bar: File/New Random Map)
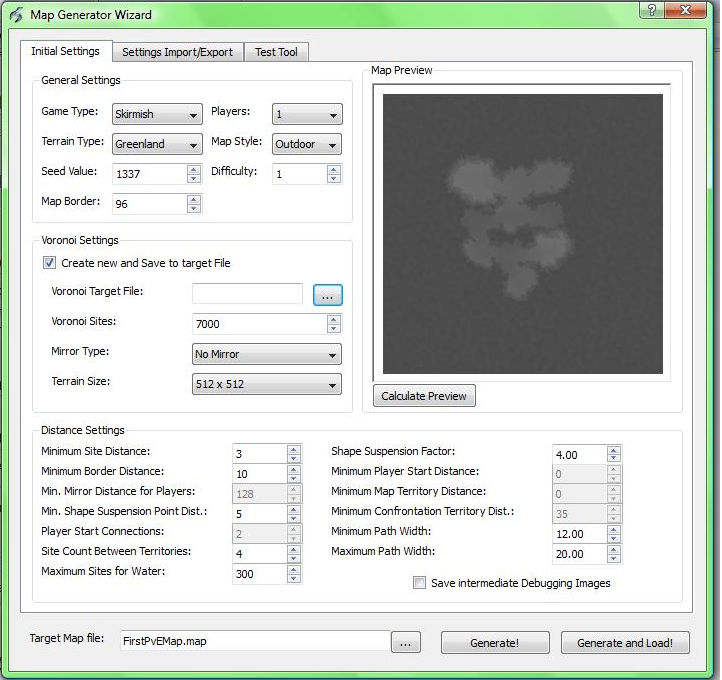
- In the Mep Generator I use the setup below:
Map Generator
I change the Game Type to "Skirmish" because we want to create a PvE (Player versus Environment) single player map and not a multiplayer PvP (Player versus Player) map.
I also switch the Players topic from "2" to "1", because we want a single player map. Then I click at the "Calculate Preview" button, to get a forecast of my map. After that I choose my map directory (C:\Users\xxx\Downloads\Documents\BattleForge\Map ) and named my map "FirstPvEMap.map"
After that I click at "Generate and Load!"
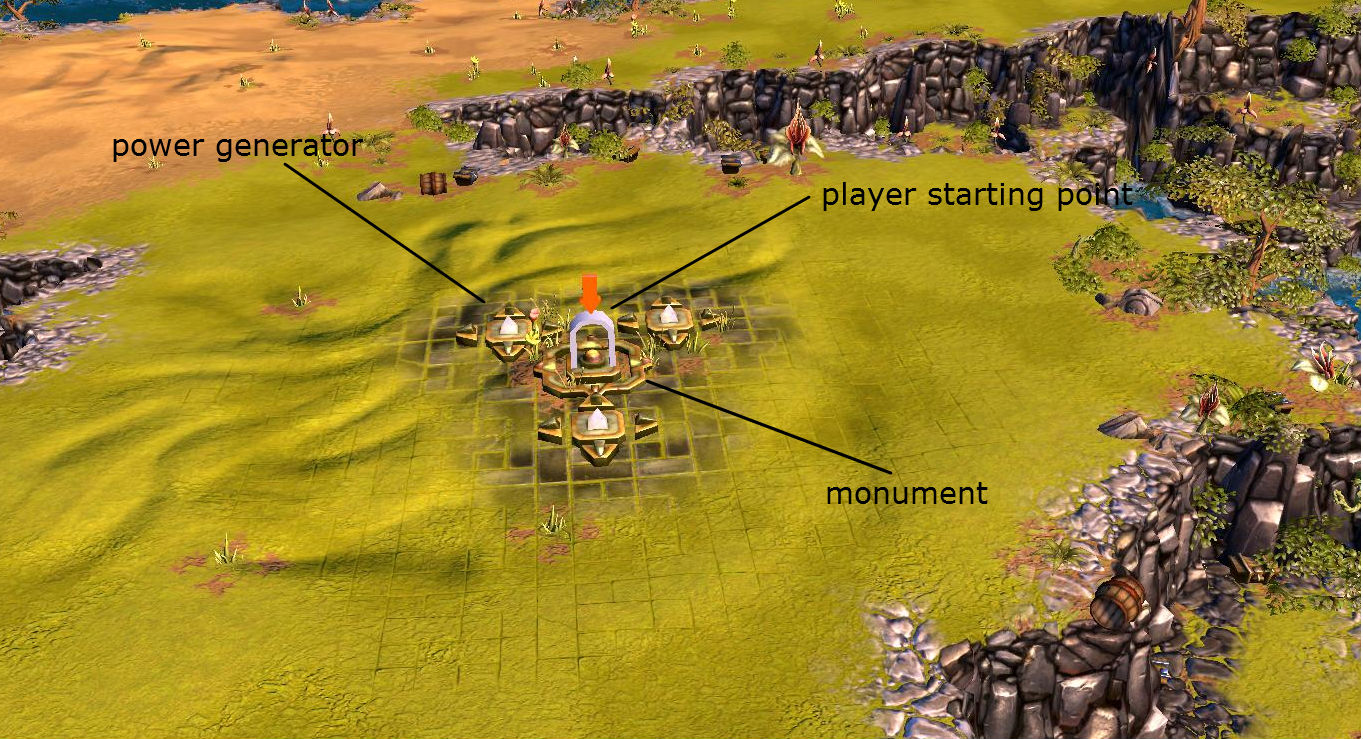
That's the result:

MyFirstMap
You will see your island with your player startpoint, 4 monuments and power generators also some goto markers and the red camera border.
You can delete the "goto" scritmarkers by using the "backspace" key.
These are only used for a computer generated map.
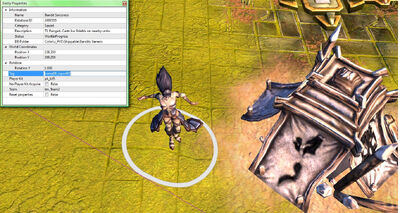
Player starting point
Before I will start to place my own enemy camps I will delete the computer placed enemies and buildings first.
I open the "Entity List" Tool select all buildings and squads and delete them.
Do the same with the gold chests. All this elements will be used in the auto generated skirmish maps at BattleForge but not in your own map.

Entity List
Don't forget to save your map after each step!
Step 2 Creating your first enemy camp[]
I choose the next monument as the place to create my first enemy camp.


place of my first enemy camp
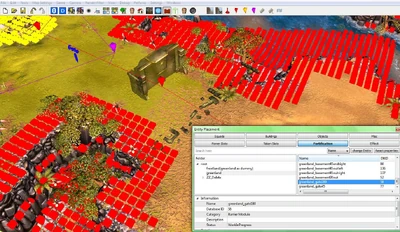
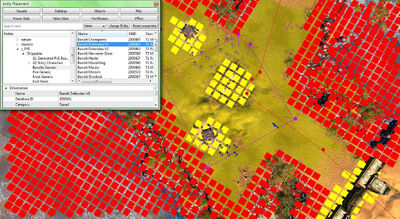
- open the "Entity Placement" tool.
- navigate to buildings/root/color/z_pve/bandits
- choose "Bandits Humanoid Crude Barracks" it is a T1 building
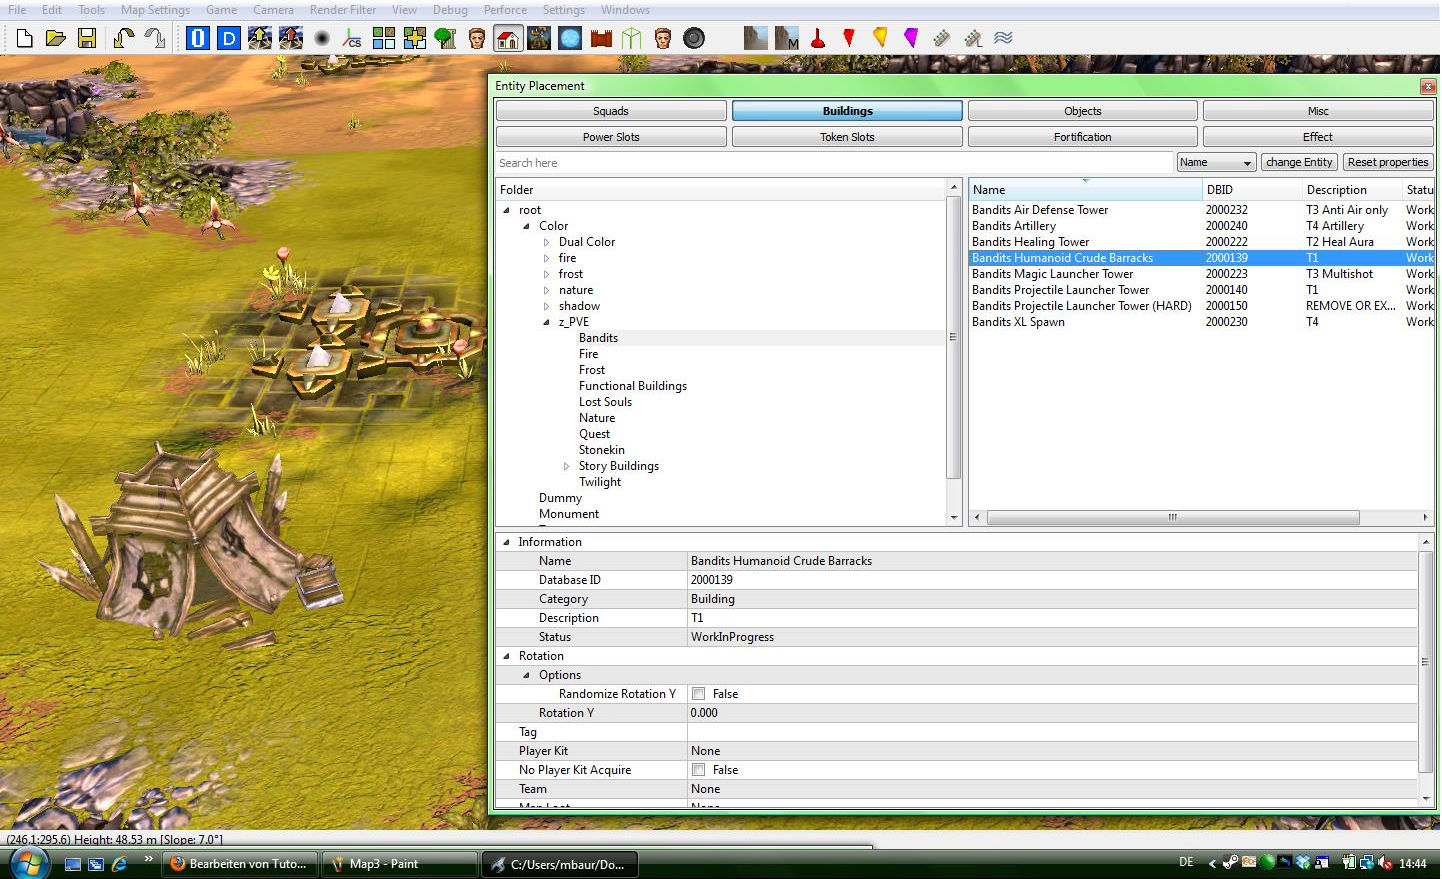

Entity Placement
Balancing Table:
| Player owns monuments | Enemy techtree level T0/T1 | T2 | T3 | T4 | T5 |
| 1 | many | few | no | no | no |
| 2 | some | many | few | no | no |
| 3 | no | some | many | few | no |
| 4 | no | no | some | many | few |
- click with the lmb (left mouse button) to place the building in your map. You can rotate the building by holding the middle of your mouse button and move your mouse up and down. To drag the building to another place hold the rmb and move the mouse to the new place.
- open the "entity property" tool and close the others to get more space at your monitor. In general EA Phenomic uses 2 monitors to work with the editor.
- select the bandit building and you will see the properties of the building at your "entity property" tool.

Team Setup
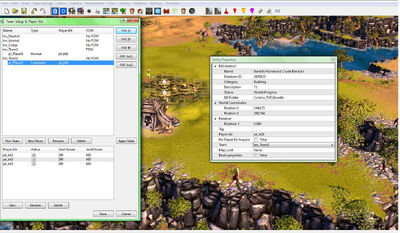
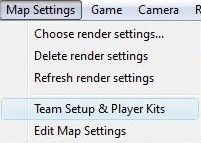
To mark the building as a enemy building we have to choose the right team and player kit. For that I also open the "Team Setup & Playerkits" you find it under "Map Settings" at the menu bar.

Menu Bar
At the "Team Setup & Player Kits" window I will see that the human player "pl_player1" is in "tm_Team1" and has the playerkit "pk_kit1". The computer player "pl_player5" is in "tm_Team5" and has the playerkit "pk_kit5".
So if you want to create enemy units or buildings use "tm_Team5" and "pk_kit5".
If you want to assaign units or buildings to the human player use ""tm_Team1 and "pk_kit1".
If you want to create neutral units or buildings use only "tm_Neutral".
In the "Team Setup & Player Kits" you will see which player has "FOW" (Fog of War) enabled or disabled. At my map only the human player has the "FOW" enabled. If you want to change this make a double click directly at the "FOW" text and a dropdown menu will appear. At least I give the bandit building a logically "tag" (name) "camp01_building01", so that I have access to the building at my script later.


Entity Properties
Step 3 Create your first enemy squad[]
- open the "Entity Placement" tool.
- navigate to squads/root/color/z_pve/bandits
- choose "Bandit Champions" it is a T1 squad


Entity Placement
- place it near the entrance of the bandit building, because the building will be the spawnpoint of the bandit squad.
- open the "Entity Property" tool and them the team "tm_Team2", playerkit pk_kit5 and the tag "camp01squad01".


Entity Properties
Now we are ready to start with our first script.
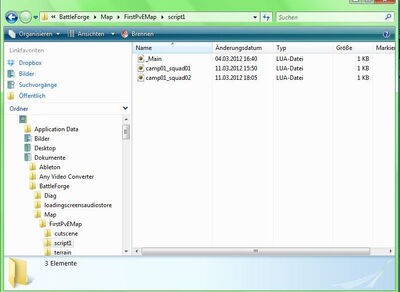
Step 4 Write your first script[]
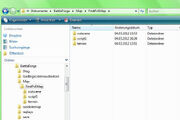
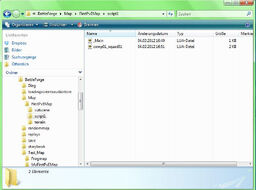
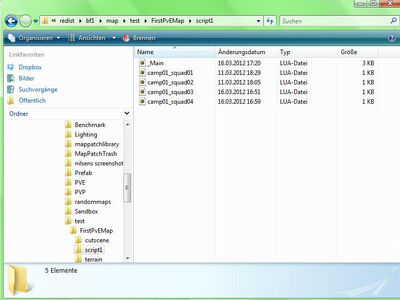
- Switch into your BattleForge Map directory

Folder Directory
You will see in your map directory your FirstPvEMap.map file and a folder with the same name. There are also a backup file, so if you have problems to load your original map, rename your xxx.bak into xxx.map and try it again.
- Create a "script1" folder in the mapname folder

Folder Structure
- Open your scripting editor (notebook++ or ultra edit)
I want to create a script with an respawn event for our bandit champios. If they die they should respawn after 5 seconds at their spawnbuilding. I have to create the respawn event in the entity script of the bandit champions. But for running our scripts in BattleForge we also need a main script.
- Create a main script
State
{
     StateName = "INIT",
};
I create a "_main.lua" file with an empty state, because we need first an entity script for our bandits champions. But to run our script in BattleForge we need a main.lua script.
- Create an entity script
create a new script file with a respawn event:
State
{


StateName = "Respawn",

    OnRespawnEvent
    {
        StartDespawned = true,
        TargetTag = "camp01_building01",
        RespawnDelayMinutes = 0,
        RespawnDelaySeconds = 5,
        HealthPercent = 100,
        Conditions =
        {
            BuildingIsAlive    {For = "ALL", Tag = "camp01_building01"},
        },
        Actions =
        {

        },
    },

};
starting with the state and a statename I named it "Respawn"
Then the OnRespawnEvent starts with following parameters:
StartDespawned: Will the squad be vanished or not, when tha map starts.
TargetTag: Where should the squad respawned (tag of the spawnbuilding)
RespawnDelayMinutes: When will the squad respawned (in minutes)
RespawnDelaySeconds: When will the squad respawned (in seconds)
HealthPercent: How many percent health will the squad get when they respawn.
Condition of the event: Only if the spawn building exitsts, the squad can be respawned, otherwise the squad is dead for ever.
- It is very important that you name the entity script like you tag (name) your enemy squad!
- Save the entity script "camp01_squad01.lua into the script1 folder

Script1 Folder
Step 5 Create a minimap & a map description[]
- jump into the "PlugInBasedEditor" and click at "Create Minimap" in the "Camera" dropdown menu at the menu bar.


Minimap
The minimap will be placed automatically in an "UI" folder nebst your "script1" and your "terrain" folder in your map directory.
- Open your script editor again an write a "description.xml" to decribe your map in the BattleFore loading menu.
<?xml version="1.0" encoding="utf-8" ?>
<mapdescription>

    <description language="en">
         <mapname>FirstTest</mapname>
         <description>This is my first test map.</description>
    </description>
    <description language="de">
         <mapname>Erster Test</mapname>
         <description>Dies ist meine erste Map.</description>
    </description>

</mapdescription>
You can provide localized versions of both the map name and its description. Supported languages are English (“en”), German (“de”), French (“fr”) and Russian (“ru”). The loading screen will show the translated text for the language the user plays BattleForge in. If you provide no translation in the user’s language it will fall back to English. The file must be UTF-8 encoded.
- Save the file "description.xml" into the "UI" folder in your map directory.


Folder Structure
Step 6 Start and test your map in BattleForge[]
- Start BattleForge and log in.
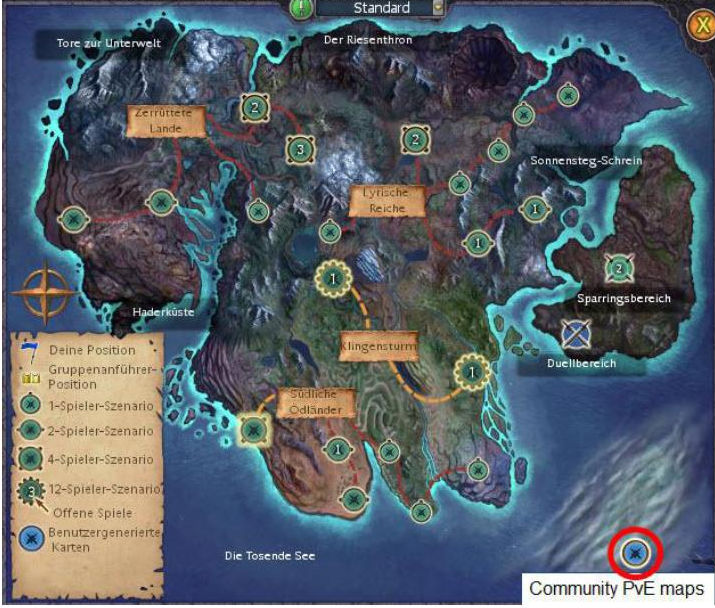
- Jump to the World Map (Games) menu and click at the “PvE-Community-Maps”.

BattleForge Menu
- Search for your map and start it. Watch your minimap and your description.
- After playtesting the first time I want to change something. At the moment the “Bandits” will respawn and than they do nothing, they still standing in front of their spawn building. For the next time the enemy squad should go to a special meeting place after they have respawned. For that we need an new action script command, but before we implement the action in our respawn event we have to place a scriptmarker in our map.
Step 7 place and use Scriptmarkers[]
- Open the map editor.
- Open the "EntityPlacement Tool".
- Choose Scriptmarker "Goto"


Scriptmarker
- Place it in front of your enemy camp.
- Open the "Entity Properties" window and name the scritmarker. I named it "MeetingPoint01".

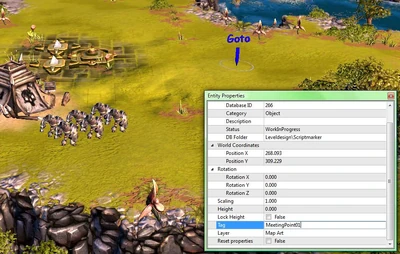
Scriptmarker
- Check that there is nothing which is blocking the way between the spawnpoint of the "Bandits" and the scriptmarker. see blocking.
- Now switch into your script editor and use following action command in yor "Respawn Event" in your "Entity Script".
SquadGridGoto {Tag = "camp01_squad01", TargetTag = "MeetingPoint01", Direction = default, IgnoreGridIfAllSquadsFly = default},
Tag: Name of the squad
TargetTag: Target place where the squad should walk to.
Direction: In degrees (0-360°) 0 = south, 90 = east, 180 = north, 270 = west. default = -180°
IgnoreGridIfAllSquadsFly: Ignores grid, if all units are flying units! default = false
State
{
    StateName = "Respawn",

    OnRespawnEvent
    {
        StartDespawned = true,
        TargetTag = "camp01_building01",
        RespawnDelayMinutes = 0,
        RespawnDelaySeconds = 5,
        HealthPercent = 100,
        Conditions =
        {
            BuildingIsAlive    {For = "ALL", Tag = "camp01_building01"},
        },
        Actions =
        {
             SquadGridGoto    {Tag = "camp01_squad01", TargetTag = "MeetingPoint01", Direction = default, IgnoreGridIfAllSquadsFly = default},
        },
    },

};
If you test yo layer unit) is in range they will start to attack these units.
Important: Be sure you have an AI grid placed. For random skyrmish maps an AI grid will automatically build, but for selfmade maps you have to create by your own. How to create or edit a goto grid click here.
Step 8 create a Script Path and start an enemy patrol[]
- Open the Scripting Tool in the "Windows" dropdown menu in your "PlugInBasedEditor".
- Zoom to your enemy camp.
- Create a path and name it using the "Entity Property Tool" (You will probably have to click on it through the Entity List). For more information about the Scripting Tool click here.
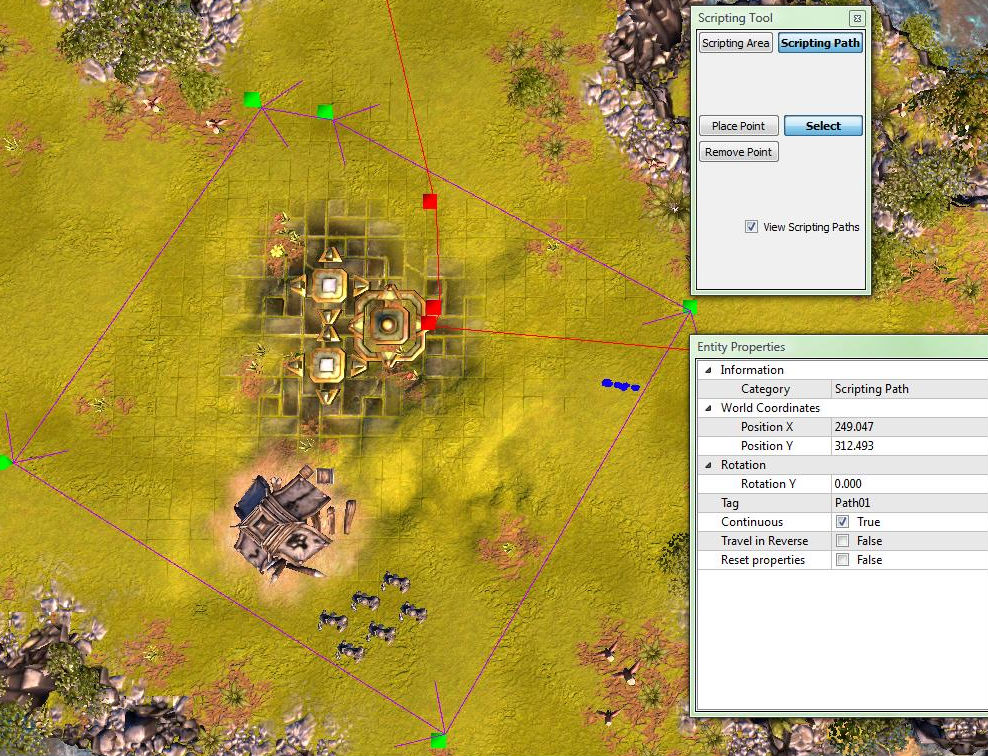

Scripting Tool
I named it "Path01".
- Place a new unit from the "Entity Placement Tool". I used the "Bandit Sorceress" and placed her near the spawn building.
- Name your new unit. I used the name "camp01_squad02".

Bandit Sorceress
- Copy your entity script, rename the file to the name of your new unit (camp01_squad02.lua) and refill the parameters of the "Respawn Event" and use the patrol action command.
SquadGridPatrol {Tag = "camp01_squad02", TargetTag = "Path01", Direction = default},
The whole script for your new unit should look like this:
State
{
    StateName = "Respawn",

    OnRespawnEvent
    {
        StartDespawned = true,
        TargetTag = "camp01_building01",
        RespawnDelayMinutes = 0,
        RespawnDelaySeconds = 5,
        HealthPercent = 100,
        Conditions =
        {
            BuildingIsAlive    {For = "ALL", Tag = "camp01_building01"},
        },
        Actions =
        {
            SquadGridPatrol    {Tag = "camp01_squad02", TargetTag = "Path01", Direction = default},
        },
    },

};
Your script1 folder should look like this:

Folder Structure
1 Main Script
2 Entity Scripts
If you test your map, the Bandit Sorceress should walk along the path. If you kill her, she will respawn after 5 seconds at the Bandits spawncamp and starts again her patrol.
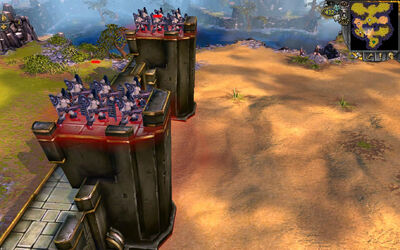
Step 9 build a fortress (barrier) and mount it with ranged units[]
- Open the "Entity Placement Tool" and click at the "Fortification" button.
- Navigate to a nice area between the player start point and your first enemy camp to build up a fortress
- You can build towers, walls and gates. I build up a wall with one gate in the middle and two towers protecting it.

If you place your first barrier objects you will see that they will visualized only as foundation walls. To make it easier to build a fortification open the "Entity Property Tool" and select your first barrier object.

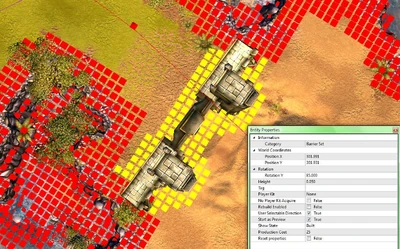
Now you can change some parameters.
Tag: Here you can write the name of the whole fortification.
Player Kit: Here you can own the fortification to the player or the enemy, we want an enemy fortification, so I choose pk_kit5.
Rebuild enabled: True = If the fortress will be destroyed the player can build it up again in the game for default costs of 25 power.
User selected direction: True = User can switch the direction of the barrier in the game.
Start as Preview: True = the game will visualize the fortification in the foundation wall mode. So the player have first to build up the fortification, before he can use it.
Show state = Dropdown menu: preview = foundation wall mode, built = barrier is build up
I choose built to see my wall in the editor and the enmy AI can't build up a fortification, they only can mount a fortification which is in built mode!
Production costs: The power costs (default = 25 power) the player have to pay he want to build up a fortress in the game, only possible if there is a neutral (no player kit) fortifiaction in preview mode is placed in the editor. The enemy AI dont have any costs they doesn't use power or monument costs.
You can move the whole fortification by holding the rmb and moving the mouse. You can also rotate the whole fortification by holding the mmb and moving the mouse up and down. I place my barrier between two blocked areas, so that the player can't walk around it.
You can delete/select single wall elements, select a single wall element by hold down the control key and click at your target wall element with the lmb. If you want to delete it click at the backspace button.


If you are ready with your fortification, select the whole wall by clicking on it and give it the right player kit "pk_kit5"for the computer AI, set all parameters to false and switch show state to "built". After that we want to name both towers, because I want to put two range enemy squads at the top of these two towers (basement180).
Hold the control key and click at one of the towers. I name the first tower "tower01" and the second one "tower02". Check that the towers are not in an red (blocked) area. Otherwise the ranged squad will never mount it.
- Now we have to create two ranged bandit squads and place them at the center of your enemy base with another spawn building. I choose the "Bandit Defenders V1" and another "Bandits Humanoid Barracks" building. Important: Only small squads can mount a fortification!

- Next we have to name our new building and the two ranged squads. I name the building "camp01_building02" (I copy the name from the first building and place it in the property tool of the second, the editor will automatically increase the last number!) Don't forget to choose the right player kit (pk_kit5) and the team (tm_Team2). For the 2 squads I choose the tags "camp01_squad03" and "camp01_squad04" and also the pk_kit5 and tm_Team2.


- Now we switch back to our script editor to create two more entity scripts for our two new bandit ranged squads. Don't forget to save your map.
- Copy your "camp01_squad01.lua" entity script and rename them into "camp01_squad03.lua" and "camp01_squad04.lua".

On the left you will see my actually "script1" folder, with one emty Main.lua file and 4 entity files.
- Now we need a new action command:
SquadBarrierMount {Tag = "default", TargetTag = ""},
We use the old OnRespawn Event, because we want that if the ranger died, that they will respawn and mount the tower again and again, until the human player will destroy their spawn building, like the other units we placed.
The complete script for one of the two ranged squads looks like this:
State
{
    StateName = "Respawn",

    OnRespawnEvent
    {
        StartDespawned = true,
        TargetTag = "camp01_building02",
        RespawnDelayMinutes = 0,
        RespawnDelaySeconds = 5,
        HealthPercent = 100,
        Conditions =
        {
            BuildingIsAlive    {For = "ALL", Tag = "camp01_building02"},
        },
        Actions =
        {
             SquadBarrierMount    {Tag = "camp01_squad03", TargetTag = "tower01"},
        },
    },

};
Remember now we are using the "camp01_building02" as our new target spawn place.
For the TargetTag is will use "tower01" for the "camp01_squad03" and "tower02" for the squad "camp01_squad04". That's all, if you start now your game the barrier will be mounted by two ranged bandit squads. Now, the human player have to attack the fortification to reach the computer enemy camp.

Step 10 implement the goals for the player[]
Now we want to implement a main goal for the human player, that they always know what they have to do and when they have won the game.
- For that we need a new event in our "Main.lua", it's called "OnOneTimeEvent" that means that this event will only be triggered once.
OnOneTimeEvent
    {
        EventName = "Goal",
        Conditions =
        {
        },
        Actions =
        {
        },
    };
The goal should start immediately if the map was loaded. I want to give the human player a goal like, destroy all enemy respawn buildings, because then I know no more enemy respawn is possible.
For this goal I need two new elements a "mission counter" and a "mission task". The counter to show the player how much buildings he have to destroy and the task for the goal text.
- At first I have to initialize the variable for the mission counter with "MissionCounterSet"
- Create and show the mission task in the game with "MissionTaskSetActive"
- Show the mission counter in the game with "MissionCounterShow"
OnOneTimeEvent
    {
        EventName = "Goal",
        Conditions =
        {
        },
        Actions =
        {
           MissionCounterSet	{Player = "ALL", CounterTag = "Goal1Counter", Value = 0},
	       MissionTaskSetActive	{Player = "ALL", TaskTag = "Goal1", TargetTag = "x", Summary = "Destroy all enemy camps"},
	       MissionCounterShow	{Player = "ALL", CounterTag = "Goal1Counter", LocaTag = "Camps destroyed", MaxValue = 2},
        },
    };
In the picture below you will see the result of the "Main.lua" script file.
Mission tasks seem to be arranged in alphabetical order. "MissionCounterShow" acts as a task in task view, therefore I named the counter "Goal1Counter" so that it would be alphabetically under the active task and be viewed in-game under "Destroy all enemy camps".
CounterTag: Name of the counter. You need this to show counter with this tag in-game with "MissionCounterShow"
TaskTag: Name of the task. You need this to later set task with this tag as completed
Summary: Text that will be shown in-game in task view
LocaTag: Text that will be shown in-game next to the counter


- The next step is to check if the human player has destroyed both spawn camps.
- For that we have to implement a new "OnOneTimeEvent" with a condition, which checks if both buildings are destroyed.
OnOneTimeEvent
    {
        EventName = "Goal",
        Conditions =
        {
           BuildingIsDestroyed	{For = "ALL", Tag = "camp01_building01"},
           BuildingIsDestroyed	{For = "ALL", Tag = "camp01_building02"},
        },
        Actions =
        {

        },
    };
You will see a new OnOneTImeEvent with two conditions, both conditions must be true to start a new action.
- Now we need some new actions. First one which solves the mission task and another which starts the player winning screen.
OnOneTimeEvent
    {
        EventName = "Goal",
        Conditions =
        {
           BuildingIsDestroyed	{For = "ALL", Tag = "camp01_building01"},
           BuildingIsDestroyed	{For = "ALL", Tag = "camp01_building02"},
        },
        Actions =
        {
           MissionTaskSetSolved	{Player = "ALL", TaskTag = "Goal1", TargetTag = "x", Summary = "Destroy all enemy camps"},
           PlayerGameWon	{Player = "ALL"},
        },
    };
If you start the game and destroys both enemy building you will get the winning screen directly. You won't recognize that the task is solved first. To solve this problem we need to implement another "OnOneTimeEvent" with a timer. Below you will see the whole "Main.lua" script.
OnOneTimeEvent
    {
        EventName = "Goal",
        Conditions =
        {
           BuildingIsDestroyed	{For = "ALL", Tag = "camp01_building01"},
           BuildingIsDestroyed	{For = "ALL", Tag = "camp01_building02"},
        },
        Actions =
        {
           MissionTaskSetSolved	{Player = "ALL", TaskTag = "Goal1", TargetTag = "x", Summary = "Destroy all enemy camps"},
           MapTimerStart	{Name = "mt_MapWon"},
        },
    };

OnOneTimeEvent
    {
        EventName = "Goal",
        Conditions =
        {
           MapTimerIsElapsed	{Name = "mt_MapWon", Seconds = 5, Minutes = 0},
        },
        Actions =
        {
           PlayerGameWon	{Player = "ALL"},
           MapTimerStop	        {Name = "mt_MapWon"},
        },
    };
I use the action command "MapTimerStart" to start a timer (Important you have to use the prefix mt_ in front oy your timername!). In another event I use the condition "MapTimerIsElapsed" to check when the timer is elapsed, here you can use the parameter seconds and minutes to edit the timer length. At the end I stop the timer, because I don't need it anymore. In the game you will see that the winning screen will appear 5 seconds after the mission task is solved.
IMPORTANT: you have to use the "mt_" prefix in front of your timer name
- Now we need one more event to increase the mission value for each building the player has destroyed.
OnOneTimeEvent
{
        EventName = "Goal",
        Conditions =
        {
                BuildingIsDestroyed    {For = "ALL", Tag = "camp01_building01"},
        },
        Actions =
        {
                MissionCounterIncrease    {Player = "ALL", CounterTag = "Goal1Counter"},
        },
 };

OnOneTimeEvent
{
        EventName = "Goal",
        Conditions =
        {
                BuildingIsDestroyed    {For = "ALL", Tag = "camp01_building02"},
        },
        Actions =
        {
                MissionCounterIncrease    {Player = "ALL", CounterTag = "Goal1Counter"},
        },

 };
I implement new "OnOneTimeEvent" for each building. You need a condition, which checks if the building is destroyed and an action to increase the counter.
Increasing the counter should automatically update the number in task view ingame.
- To improve our goals I want to implement a minimap ping for each building and I want to observe the FOW (fog of war) around the buildings.
A minimap ping shows the player the location of the buildings in the minimap.
OnOneTimeEvent
{
        EventName = "Init",
        Conditions =
        {

        },
        Actions =
        {

           MissionCounterSet	{Player = "ALL", CounterTag = "Goal1Counter", Value = 0},
	   MissionTaskSetActive	{Player = "ALL", TaskTag = "Goal1", TargetTag = "x", Summary = "Destroy all enemy camps"},
	   MissionCounterShow	{Player = "ALL", CounterTag = "Goal1Counter", LocaTag = "Camps destroyed", MaxValue = 2},

           FogOfWarObserve	{TargetTag = "camp01_building01", Team = "tm_Team1", Range = 15},
           FogOfWarObserve	{TargetTag = "camp01_building02", Team = "tm_Team1", Range = 15},
	   MiniMapAlert	{TargetTag = "camp01_building01", AlertType = AlertQuest},
           MiniMapAlert	{TargetTag = "camp01_building02", AlertType = AlertQuest},

        },
 };
You can implement the new actions in your first Event in your "Main.lua" file.
FogOfWarObserve needs the Team of the human player and the range in meters of the hole in the FOW
AlertType = AlertQuest = white circle
AlertType = AlertAttack = red circle
Now the whole "Main.lua" script:
State
{
    StateName = "Respawn",


--The mission counter and task will set
   OnOneTimeEvent
   {
        EventName = "Init",
        Conditions =
        {

        },
        Actions =
        {

           MissionCounterSet	{Player = "ALL", CounterTag = "Goal1Counter", Value = 0},
	   MissionTaskSetActive	{Player = "ALL", TaskTag = "Goal1", TargetTag = "x", Summary = "Destroy all enemy camps"},
	   MissionCounterShow	{Player = "ALL", CounterTag = "Goal1Counter", LocaTag = "Camps destroyed", MaxValue = 2},

           FogOfWarObserve	{TargetTag = "camp01_building01", Team = "tm_Team1", Range = 15},
           FogOfWarObserve	{TargetTag = "camp01_building02", Team = "tm_Team1", Range = 15},
	   MiniMapAlert	{TargetTag = "camp01_building01", AlertType = AlertQuest},
           MiniMapAlert	{TargetTag = "camp01_building02", AlertType = AlertQuest},

        },
    };

--2 Events which increases the mission counter if a building is destroyed
   OnOneTimeEvent
   {
        EventName = "Goal",
        Conditions =
        {
                BuildingIsDestroyed    {For = "ALL", Tag = "camp01_building01"},
        },
        Actions =
        {
                MissionCounterIncrease    {Player = "ALL", CounterTag = "Goal1Counter"},
        },
    };

   OnOneTimeEvent
   {
        EventName = "Goal",
        Conditions =
        {
                BuildingIsDestroyed    {For = "ALL", Tag = "camp01_building02"},
        },
        Actions =
        {
                MissionCounterIncrease    {Player = "ALL", CounterTag = "Goal1Counter"},
        },

    };


--Check if both buildings are destroyed, then mission task will solved
   OnOneTimeEvent
    {
        EventName = "Goal",
        Conditions =
        {
           BuildingIsDestroyed	{For = "ALL", Tag = "camp01_building01"},
           BuildingIsDestroyed	{For = "ALL", Tag = "camp01_building02"},
        },
        Actions =
        {
           MissionTaskSetSolved	{Player = "ALL", TaskTag = "Goal1", TargetTag = "x", Summary = "Destroy all enemy camps"},
           MapTimerStart	{Name = "mt_MapWon"},
        },
    };

--after 5 seconds the winning screen will shown
    OnOneTimeEvent
    {
        EventName = "Goal",
        Conditions =
        {
           MapTimerIsElapsed	{Name = "mt_MapWon", Seconds = 5, Minutes = 0},
        },
        Actions =
        {
           PlayerGameWon	{Player = "ALL"},
           MapTimerStop	        {Name = "mt_MapWon"},
        },
    };

};
If everything works fine you should see the winning screen after you destroyed both enemy spawn camps.


Step 11 implement outcries[]
If you want to put some story elements into your map you can show some outrcies.
I will start a small dialog between two well known characters in BattleForge, Viridya and Rogan Kayle.
For the dialog I only need two "OnOneTimeEvents". To keep my main script well-arranged I will create a new lua file and name them "Outrcries.lua". That my own script will load I also have to create a "_ScriptList.lua" file.
The ScriptList.lua has to include this script to load "Outcries.lua" file:
return
{
    "Outcries.lua",
}
After that I open the Outcries.lua file and implement three OnOnTimeEvents.
State
{
    StateName = "Outcries",


    OnOneTimeEvent   --Start of the OnOneTime Event (this event will trigger only once)
    {
        EventName = "Outcry1",
        Conditions =
        {
        },
        Actions =
        {
            MissionOutcry    {Player = "ALL", Tag = "x", TextTag = "", Text = "Das ist mein erster Outcry!", DurationSeconds = 5, PortraitFileName = "unit_viridiya_outcry"},
            EntityTimerStart    {Name = "et_Outcrytimer"},
        },
    };

    OnOneTimeEvent   --Start of the OnOneTime Event (this event will trigger only once)
    {
        EventName = "Outcry1",
        Conditions =
        {
           EntityTimerIsElapsed	{Name = "et_Outcrytimer", Seconds = 6, Minutes = 0},
        },
        Actions =
        {
            MissionOutcry	{Player = "ALL", Tag = "x", TextTag = "", Text = "Nice to see you, too. It's always a pleasure!", DurationSeconds = 5, PortraitFileName = "unit_rogan_kayle_outcry"},
        },
    };
 };
The outcry action command needs following parameters:
Player = Who should see the outcry? ALL = All players
Tag = needs a "x"
TextTag = can be ignored
Text = The text you want to show in the game
DurationSeconds = How long the Outcry should be visualized in the game
PortraitFileName = Click here how you can create your own portrait or choose one from the list
I connected also the two outcries with an entity timer. I use an "entity" timer because I use the timer in the same lua file it is a kind of a local varibale. In the main.lua we use a "map" timer, this timer you can also use for a different script file (like a global variable), but it has to be in the "script1" folder.
Save your ScriptList.lua and your Outcry.lua.
Your "script1" folder should look like this:


In the game it should look like this:

I hope you enjoyed this tutorial and start to create your own.
All script conditions you will find here.
All script actions you will find here.