
| ||||||||||||
See Also: Blight (Character)
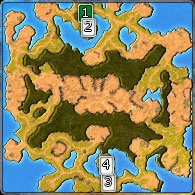
The Blight Scenario is a four-player map available on standard, advanced, and expert difficulties.
Goals[]
- The Fire Prisoners
- Free the fire units from their cages
- The Bandit Camps
- Destroy the Bandit Camps before they can launch attacks on you
Walkthrough[]
Standard[]
I am going to focus this walk through on one of the harder sides of this map: position 2. If you are in position 2 you need to have good T1 cards and upgraded T1's. My deck is a pure fire deck with 4 legendary cards (Promo Rogan Kayle[1], Viridya (up1), Moon (up 2), and Promo Mo. I mostly used Mo). I have a Scavenger Up.1 with charge upgrade so i had a total of 8 scavengers waiting for me (i chose to use scavengers because they have the swift ability along with crippling bite). I summoned three (had to wait and build power to summon the third) and then marched them off to the right of the field. You'll see a hill with 2 banditos and one commandos along with a power well. I summoned a fourth scavenger and lured the banditos down the hill a bit forcing the commandos to run before attacking. I focused all my scavengers on one group at a time and killed all 3 groups to claim the well. I let my scavengers heal and summoned two more. By now you may only have 2-3 minutes left before the attack comes. If you go down the hill and keep going southeast you'll find both the camp you need to destroy and another camp with 2 spearmen, a shaman, 2 commandos and a bandit hut which all guarded a power well. DO NOT attack this camp unless you have an army of 7+ units, otherwise its just a waste of time. The bandit camp first objective has 6 spearmen, a shaman, and 2 bandit launcher towers (and by now i had all 8 scavengers). The spearmen are split into three groups of two, each group protecting one of three entrances while the launchers sat on hills near them. Lure out the first two spearmen (if you have any T1 attack buildings now is the time to start constructing them) and kill them. After that kill the shaman who followed the to spearmen and go around the tower on the outside. Attack the next closest group of spearmen and kill them (you're buildings should have finished constructing and will now handle one of the towers). You should have 1-2 minutes left now, focus all fire on the bandit hut and destroy it (the tower and remaining two spearmen will try to save it). Lure the spearmen away from the safety of the tower and kill them then move in and destroy the last tower. Now build your wells first and then your orb (with luck your teamates will still be working on destroying their huts, giving you time to rest) and destroy the T1 buildings you build earlier (if any). Now is the time to move north and clear out that bandit group i described earlier and claim the well. Your second orb should have finished building and your allies should have destroyed their camps. Sacrifice your remaining T1 units (since i'm pure fire i built a glorious shrine to immediately recover a certain percent of their void power). The second camp has two skyrakes, a sniper, two shamans, two towers, two commandos and two banditos along with your objective hut. Build at least 2 sky hitting units to kill the skyrakes and focus the rest on your ground troops. I focused on building my siege T2 unit Fire stalker to destroy the next camp. When nearing it construct a building just in case your army dies (i built a Rallying Shrine so my units wouldn't be dazed when summoned near it). Use your ground units to lure all units out of the camp, pulling them away from the extra fire of the towers, use your sky hitters to kill the skyrakes quickly. Then use your melee to work down the banditos, commandos, and shamans while using your range to work down the sniper. Ignore the towers once all units are dead and focus all fire on the bandit hut (suppression works well with the enemy towers since it will stop their fire long enough to destroy the hut). If you wait too long the skyrakes will respawn and wreak more havoc over your troops. Once this area is clear build the wells and then the orb and wait for your allies to finish with their camps. Now comes the hard part, where you meet with an ally and attack the largest camp. I built another Glorious Shrine to sacrifice all my T2 units, you can move with a group of T2 and T3. Once all sacrificed i summoned a promo Mo and several Magma Hurlers (Up.2) to attack the big camp. On the way to the big camp you'll find a fork in the road, from the left path commandos and banditos will spawn to attack from one group while 2 skyrakes and a skyhunter attack from another group. Either build towers to attack both air and ground units (i suggest 4 or 5 because of the size of the groups that attack) or build defenses at your third orb to fight back the respawns. Follow the fork to the right and youll hit the large camp, a Gunner and commandos await you on the first hill along with two bandit launchers and a rioters retreat, the gunner has a powerful AoE attack that can one shot most T2 and some T3 units. Kill the gunner first because his punch is even stronger, then wipe out the towers with range and the commandos with melee, then all focus on the rioters retreat. Once this is done proceed into the center where you'll find two wells and two orbs (one each for you and your ally) along with shamans, skyrakes, potentially a skyhunter and two huts. Wipe all of these out with your allies aid and build the well then monument. No you have T4 so unless my you have really good T3 units, sacrifice them all (i had Mo and several hurlers left, i killed the hurlers). Summon a group of powerful T3 and T4 units (about 3-6 x-large units should do) and go back out of the camp the way you came in. Now take left fork in the fork and attack the camp there (you'll find another well and monument, build these immediately after). Now you can either call your protective group near your third orb to join your main army, or destroy it and all towers you've built up to this point. Activate the amii device that makes the bandit liutenant vulnerable to melee and ranged attacks (trust me, its alot easier when he can be dealt damage from both) and assemble an army of about 10+ units with at least 1500+ health. When you arrive in the center you are greeted by a few skyrakes, maulers and banditos, along with a big problem: a bandit construct. Use all range units to kill him quickly (and melee if the liutenant is distracted with another unit). Do not worry about freeing the fire people yet, focus on your liutenant and his towers, once he has fallen, proceed into the center and destroy the huts (aid your allies if they have yet to destroy their half of the bandit camp) then free all the fire people. Now all your allies are together and there is just on final objective: Kill Blight (not really). He starts with only 100,000 health so with enough focus fire from everyone he'll die within under a minute (rather retreat). Once he uses storm and thunder to flee the game is over and you've won! claim your rewards and prepare for the final fight with Captain Blight.
Expert[]

Solo video by Murvegg. The link is to his 5 part long "cheap deck" version that he made to show that "anyone" can do it. In reality, no, not anyone can do it. You do need some key cards which are rarely sold for gold but you should be able to beat it with a minimal (500bfp) investment. The nice thing about this version of the video is that Murvegg goes over the cards in his deck at the start and tells which ones he thinks are essential.
Key cards are the crowd control cards (Ensnaring Roots and Curse of Oink). Having a T2 flying card helps a lot but something with swift and Siege like Burrowers can substitute but will take longer. Having a Shaman is important as well. Other than those cards, you can probably get by with the starting freebie cards.
In general, the trick is to take out the first barracks and then dodge all of the remaining attacks. This tactic takes advantage of the 60 second rebuild timer when you lose all of your orbs as well as the side base that is not on the enemy's warpath. In the beginning, I recommend that you limit your army to 6 Windweavers and 3 Shamans. This will give you enough power to rebuild your orbs and wells and reduce your waiting time.
Once you've dodged all of the attacks you have free run of the map and are not held to any time constraints anymore. You can still run out of power so don't go recklessly throwing your units at the enemy bases. The 2nd base is easily eliminated but be sure to go immediately after you eliminate the regular patrol. Taking on the patrol and the base at the same time is sure to fail. Also, don't let the Bandit Soulhunter too close to your units or he will spawn mines all over the place.
Now that you've cleared the 2nd base and have two orbs you have to deal with two patrols while you attack the 3rd base. The first is the regular patrol which is now accompanied by a Bandit Sniper. The second is two Bandit Windhunters and a Bandit Skyrake. The flying patrol will not attack you unless you are nearby the 3rd base but it can be incredibly devastating if it attacks while you are attacking the base. The trouble with this base is the artillery. Tease out the base guards little by little and then send in whatever you have to take out the Bandit Artillery. Having a flying unit like Skyfire Drakes will reduce the amount of units that you have to tease out of the base before you attack. After the artillery is gone, taking the 3rd base is easy. Something to note is the Bandit Vanguard spawn by the 3rd base. Be very careful that you don't accidentally send any units up the route just southeast of the 3rd base with the mine shaft opening. If you pass through there a group of something close to 5 Vanguards and 3 Bandit Crossbowmen will spawn.
Having your 3rd orb also means more nuisances. The previous flying patrol will come to harass you from the south entrance to the 3rd base and the typical patrol attacks from the north entrance. At this point you can grab some extra power wells by clearing the northwest side of the base. There is another artillery in the 4th base so, once again, having a flying unit is useful. Attacking this base from the north is most efficient route because attacking from the south can sometimes attract a group of 3 Bandit Drakes that patrol the last base.
Once you've taken your 4th orb the patrols will change to include a Bandit Tortugun and a Bandit Soulhunter. Using some flying units, sneak into the last base along the bottom and take out the barracks. This will finally stop the patrols and allow you to amass an army peacefully. Tease out the groups of flying units guarding the Bandit Lord and have some flying units take out the Bandit Walker. After that, have your way with the Bandit Lord.
Now you're done! Wait, no. Since you're playing alone you have to take down both Bandit Lords yourself. If your army is mostly ranged units, you'll probably want to hit the anti-magic switch but that's on the other side of the map and requires you circle around the map. Otherwise you can try to tease out just the Bandit Lord and kill him by himself. I prefer the long route. This keeps me from accidentally pulling extra units while I'm fighting Blight.
Blight isn't much tougher than before but when you're taking him on by yourself it might take you a few attacks before you get him. Like in advanced, he has Coldsnap and is immune to spells. He also teleports around sometimes. If your first attack fails, try to rebuild quickly because he rapidly heals.
Rewards[]
For completing this scenario, players are granted some PvE Experience Points, Gold, and four Upgrade Cards.
Scenario Progression[]
Completing this scenario unlocks the following scenarios:
| Completed Scenario | Difficulty | Unlocked Scenario | Difficulty | Edit Link |
|---|---|---|---|---|
| Blight | Standard | Blight | Advanced | [edit] |
| Blight | Advanced | Blight | Expert | [edit] |

Battleforge has been revived by a group of passionate players and developers under the name Skylords Reborn
It is a fully functional, community-made, non-profit and completely free-to-play relaunch of the game. The relaunch has been worked on for several years, and receives regular updates.
The new Wiki can be found here: Skylords Reborn Wiki Page
.